
To start with an infinite image slider using just HTML and CSS is not that big task and will be so easy for an absolute beginner as well. So lets get right into how we can build it, I am explaining it here with only three images but you can have number of images of your choice, but for that you just have to calculate some of the values according to the number of images and have to write some more lines of codes during the animation part. And most importantly as this method is for absolute beginners, this not that much effective way of achieving an infinite slider, as when you will have many images to slide then your work will keep increasing so at that time you have to use javascript for an effective and efficient code.
Although it is not an efficient way for handling a slider with many images but it is the most lightweight image slider for a slider with only a few number of images.
Alright lets get on to the making process of this infinite slider.
See the Pen Untitled by TheFakeCreator (@Sanskar-the-styleful) on CodePen.
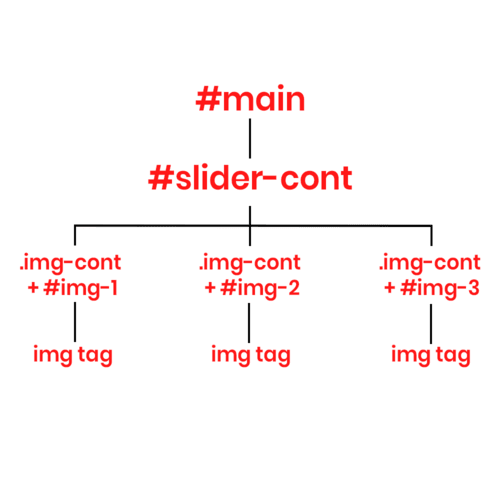
In the above code snippet, you can see how the HTML is structured. Understanding the proper structure of our HTML is crucial to achieving the desired result. The HTML structure for the infinite slider consists of
You can have a better understanding of the HTML structure from the flowchart below.
This was about the HTML part now lets come to the CSS.
In the CSS firstly we select the main container and style it so that it will cover the whole viewport and then make it a flexbox so that we can easily position the child elements to our desired places in the flexbox. Later we also mark the slider-cont as a flexbox to position the child elements, also we will give this (#slider-cont) position of relative so that its child elements can position relative to this container, and for that we need to give position of the child elements a value of absolute. The height and width property of the conatiner is one's choice, here we are using 500x500 pixels, and we justify the content to center and align the items to center after doing this all of the elements should be at the center of the container overlapping each other. After doing this we go to the class img-cont and we restrict its width to 400px (You can select whatever you want, as here we are making a slider where only a single image is visible at a time so we are taking 100px less than the container to restrict the image in the view of the #slider-cont) and the height to auto, to adjust on the basis of image height automatcally.
Now we set the overflow of the #slider-cont to hidden so that any overflowing item can't be seen. Now we will move further to position the images to their initial position, so as for #img1 we set the left to -500px which is out of the container's view in the left direction, similarly the #img3 to left 0px which is at the center of the container and #img2 to left 500px which is out of the container to the right side, till this point only image 3 will be visible and other two will be hidden.
We will design seperate animations for each of the images, namely slideLeft1, slideLeft2 and slideLeft3.
So to understand the animations easily we have to get familiar with some concepts of animations.
An animation can be understood as a flow from a set of values to another set of values by continuosly changing the values in a way so that the final state can be reached. For Example: moving a box from a position of 0 to a position of 100px, these two positions that I mentioned are two different states between which our animation will work and here the value of the box's position will gradually change with time (specified by us) and finally reach the final (100px) state. And when we combine several properties that changes from one state to other then it is known as a keyframe. A Keyframe contains all the values of a certain state of the element for a particular instant.
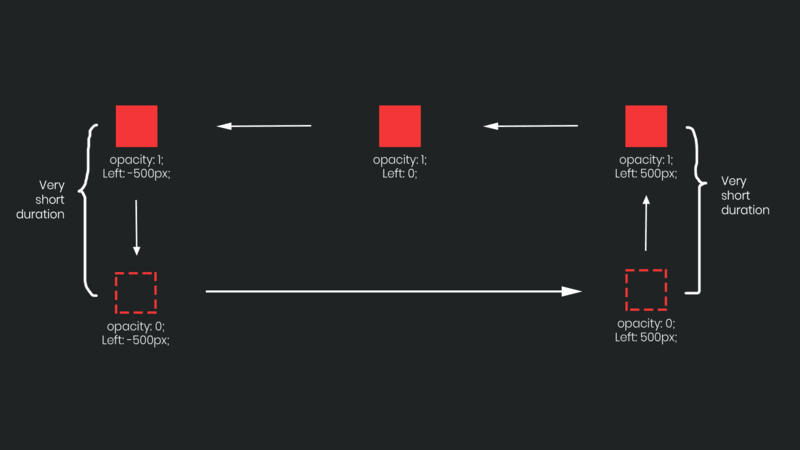
See the center image has a value of
left: 0px; and Opacity: 1; at its initial position. As we want the slider to move from right to left our next destination should be positioning the image outside the image container in the left so that image should not be visible so we set left: -500px;and Opacity: 1;. After this step we want the image to move to far right outside of the image container to move in again to the visible area. For this we set Opacity: 0; so that it will not be visible to the user when it is going there, and we set the opacity in a very less time. Then after reaching to the left: 500px; we keep the Opacity: 0; to make the image not animate between Opacity: 0; and Opacity: 1; while it was moving from left to right. After this we set the Opacity: 1; in very less time which is then ready to enter to the visible area as we set the other keyframe left: 0px; and the loop continues. For better understanding you can always see the above flowchart.


